One of the most essential tools for training is your tape. It's there not only to support your endeavors as you work out despite injury. It is there to remind you that you are still in recovery!
Every repetition needs careful movement since over-exertion would only make things worse.
Your tape accomplishes this goal by working with your brain, be it the bright yellow color or the pulling sensation while it is being worn. It is there to serve several purposes but, most importantly, to protect you!
So the question becomes, how do I get the most out of this brightly colored nylon and cotton fabric?
While the most common and wrong answer would be. Put more tape on! That might only be slight, as it would give the treated area more support. No, the answer to it is not to just stick more tape on it, but rather know how to take care of it, how long to use it, how to wear it, and when not to apply it.
Keep reading to learn the top tricks to K-Tape.
Health History:
Before Kinesiology tape, the available tape on the market was surgical tape. A rigid cloth that did not allow for movement. At the time, the surgical tape had one job, to keep things from moving around. It was also designed to be used over or around wound dressings.
The idea was that the tape would keep things in place and protect the injury.
While this worked well for injuries that required forced rest, athletes that felt they could train while still enduring the injury were forced to sit by and let the time slip by as their competition was still able to progress.
Dr. Kase, a Japanese chiropractor, combined nylon and cotton to create a stretchable fabric, then used a powerful adhesive that included a non-steroidal anti-inflammatory to help fight off inflammation so athletes could still work out while recovering.
The creation of the kinesiology tape was great news for the athletes and meant they could still work out despite injury.
When to use the tape:
Kinesiology sports tape sees two significant applications, prevention and recovery. In the case of prevention, an athlete or enthusiast is made aware of improper technique; as a preventative measure and to help correct the issue, a kinesiology tape can be applied.
The sensation of the tape against the skin and the brightly colored tape creates a constant reminder that the person is working on correcting an issue that needs attention.
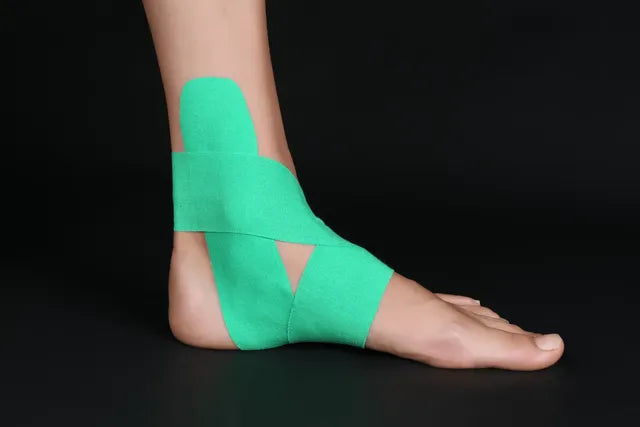
In the case of use for recovery, once the injury has been determined to benefit from the tape, it is essential to know what type of pattern is needed.
A twist might not be dressed in the same fashion as a sprain. Here the tape works to support an injury, and proper tape application is a must to ensure you are getting the most out of the application.
Combining it with Other Care:
Traditionally the proper recovery involved using the R.I.C.E method. Rest, Ice, Compression, and Elevation. Using traditional wisdom of treating injuries while updating the technology has resulted in faster recuperation.
While the resting portion of the R.I.C.E method is supplanted by a slow and methodical training regime designed to avoid further injury, the Icing down of the inflamed area, the use of compression in the form of applying Kinesiology tape to fight off swelling and elevating the injury to avoid fluid accumulation works very well.
How to Apply the Tape for Best Results:
Suppose it is the first time using K-tape. In that case, an injured athlete should seek medical advice from a chiropractor or some figure in sports medicine on how to apply the tape once the injury has been understood and a plan of how to dress the injury established.
Have the doctor explain in detail what the pattern should look like; ask for a brand recommendation or samples; you must test out the tape since there is always a possibility of an allergic reaction.
Cut a small strip of tape, place it on the skin, and wait. If you detect any redness or itching, remove the tape and was the area well. Once you are comfortable knowing there are no health issues, proceed to apply the tape.
Proper Application:
- Cut the tape into the strips.
- Make sure you have cut the necessary amount in proper lengths.
- Shave excess hair from the area.
- Dry off the area to ensure proper adherence to the tape
- Peel the back liner from the tape.
- Apply tape to the skin.
- Once adequately applied, rub vigorously to activate the adhesive.
Tape removal can be painful if not done correctly. Lather up the area with plenty of warm water and soap. Peal in the direction the hair grows on the body. If the adhesive is still firmly attached to the skin, soak the tape in baby oil for 20 minutes or until the adhesive loosens and then peal.
Extend the Life of Your K-Tape:
The good news is the adhesive on the tape can last up to five days if properly maintained. It is not recommended to peel off and then reapply the tape the following session since the adhesive on the tape would have lost adhesion and will not offer proper support or protection.
Firstly, remember that humidity is your enemy, so once you are done working out, dry the tape and the area around the tape and avoid picking at the edges. Clean the tape across its length with a damp towel and lightly spray rubbing alcohol to clean the area. Avoid using excess soap since it might loosen the adhesive.
The kinesiology tape's adhesive is notorious for its strength and should last you. It is recommended to change the tape after five days. By this time, the edges should be peeling off by themselves, and the constant stretch does cause some wear and tear. So it is not providing as much support as when initially applied.
Cutting Correctly:
Kinesiology tape application can sometimes require a person to cut along the length of the tape, so one strip of tape covers several areas. Correctly cutting the tape will allow the tape to last longer on the skin. Several shapes can be made from strips of tape, but the tape is always cut along its length when shaped.
I Shape: A cut along the width to create a tape measurement to run along the muscle.
Y Shape: A Vertical is cut at the top of the tape to create 2 divisions. The tape looks like the letter Y.
X Shape: Two cuts down the middle at both ends to create an X shape.
O Shape: A cut down the middle, leaving the tip and the end together, creating an O-like figure
Fan Shape: Multiple cuts from four to five create several strips that can stretch out.
Kinesiology tape and application use these figures to help different sections work together. When applied, one of the tape strips usually anchors the others in place. This anchor tape is usually longer and applied at the end.
While not all kinesiology tape applications will require an anchor since there is a simple application that only uses two strips to create an X figure on the body, when a person is instructed to run a piece of tape over the rest, this is the reason. So that piece of tape can act as an anchor point.
Find top-quality tape here from Hampton Adams.